Here it is:
https://drive.google.com/file/d/1zidK6o4N-ibEl3eHVQpWMg8kY-lZk8Ru/view?usp=sharing
Sunday, April 7, 2019
Creative Critical Reflection (CCR)
Here is my Creative Critical Reflection to my film opening, Younger.
https://drive.google.com/file/d/1QRkuI4hcku9cEzOW_o4a2s-yknoaUI6f/view?usp=sharing
Bibliography:
https://docs.google.com/document/d/1k4T7e_MdRuE7Ba0SauwCI3kQGwNL5LqBdxmWZSmlOik/edit?usp=sharing
https://drive.google.com/file/d/1QRkuI4hcku9cEzOW_o4a2s-yknoaUI6f/view?usp=sharing
Bibliography:
https://docs.google.com/document/d/1k4T7e_MdRuE7Ba0SauwCI3kQGwNL5LqBdxmWZSmlOik/edit?usp=sharing
Saturday, April 6, 2019
Quick Reflections
Overall this project was such a great test of my imagination, time management, and team building skills. I'm glad to have taken this class where I get a chance to test my true creative abilities (even when it makes me sacrifice a weekend editing). Thanks Raul for sticking with my through this whole journey. Now I got to get back to work!
Friday, April 5, 2019
Lighting
Like I said in my post about "The Set for Younger," here is a post about the lighting I used during the filming process. I will be showing screen grabs from the final piece to depict the different lighting styles I used and also to give you a little sneak peak!
 For this scene, we mainly used the lighting inside my room which included multiple hanging lights which I think really fills the shot with light yet still giving a moody vibe.
 For this hallway shot, no lighting techniques were really used. Simply the lights on the ceiling did the trick. :)
 This shot is probably where I think we went wrong during the filming process. I was hoping the light from inside would brighten her face more, and sadly the lights on her left don't do much justice in giving her a back light. Mistakes happen!
 For this long shot we again used the LED light box to give off more light in the front, and the positioning of the street light in the back offered light behind the subjects. However, I do find the blaring light a little distracting.
 For this shot I had my friend holding an LED box light high above our heads to give off that "moon light" feel. The lights from inside my room gave him good back light.
 For the shots in the kitchen, we just turned on all the lights in kitchen as well as all surrounding areas to give a balanced lighting scheme. We wanted to make the kitchen scene look as authentic as possible.


Thursday, April 4, 2019
The Final Stretch
YAY!!!! The final stretch. This week is the last week for creating my film opening which has involved countless hours of editing both my CCR and film opening.
__________________________________________________________________
Here are some things I did during this final week:
I found audio!
I found this copyright free song and the notice is screenshotted Above!! I found this song about five minutes into my search and I just knew that it was the one.


I found audio!
I found this copyright free song and the notice is screenshotted Above!! I found this song about five minutes into my search and I just knew that it was the one.


__________________________________________________________________
I figured out color correcting!!


Here are two screen grabs from footage of the film opening. The one above is the final color corrected footage. From my research I have noticed the success of a orange and teal color scheme. So I took inspiration from that and adapted my own style to the orange and teal style giving the shots an additionally more warm and moody feeling.
__________________________________________________________________
I Finished editing the film!
I would give you some details about the film but...... you will have to find out on Sunday!
___________________________________________________________________
I began editing my CCR!
Oh boy was this a project, with all these videos of me talking, I guess you can say that I am already sick of myself. I'd say editing the CCR will take twice as long due to me having to condense 25 minutes of me talking to 7 minutes. Also, the amount of times I had to cut out me saying "um" makes me want to punt my computer across my room. But anyways, I will get it done. :)))

Sunday, March 31, 2019
The Editing Process
Spring break was incredible. I did great at my MUN conference and went on an amazing road trip to Charleston, South Carolina. However, I definitely slacked a little on moving forward with my project, but I can say editing is in progress. This post goes through how I began editing the film opening.
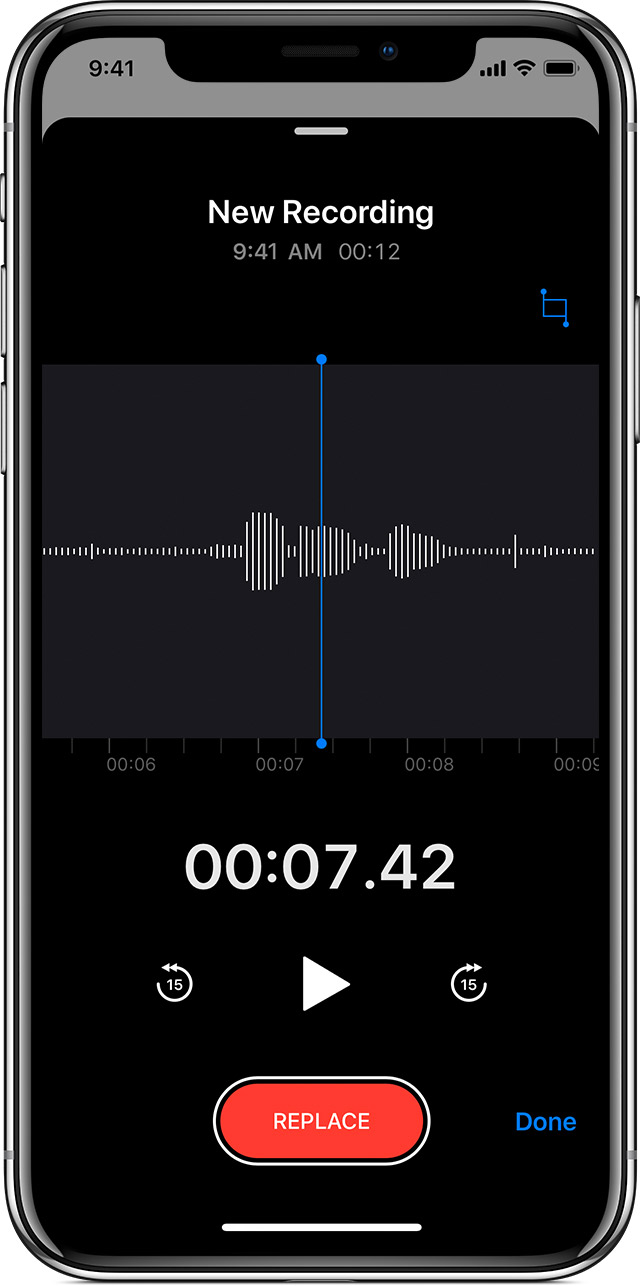
 Starting any edit is a daunting process. Seeing that blank editing screen really puts the amount of work I need to do into reality. This image shows my favorite format to edit videos on Premiere. I keep it mostly default, but I make sure the timeline is zoomed in a lot because I like to be able to see and work with as much of the clips as I can. For this edit in particular, I will leave the graphics tab open so that I can easily add titles and credits.
 This photo pretty much describes my experience editing with Premiere. It is a powerful editing software, so it often causes my computer's tiny processor to crash a lot... and I mean A LOT. So much so I literally have to save my work every five minutes. I would hate for an hour of work to disappear (which has happened an overwhelming amount of times)
 Now is the time to start putting the clips on the timeline. At this time I go through each clip in chronological order and double click so I can do some quick trimming (in the top right corner)
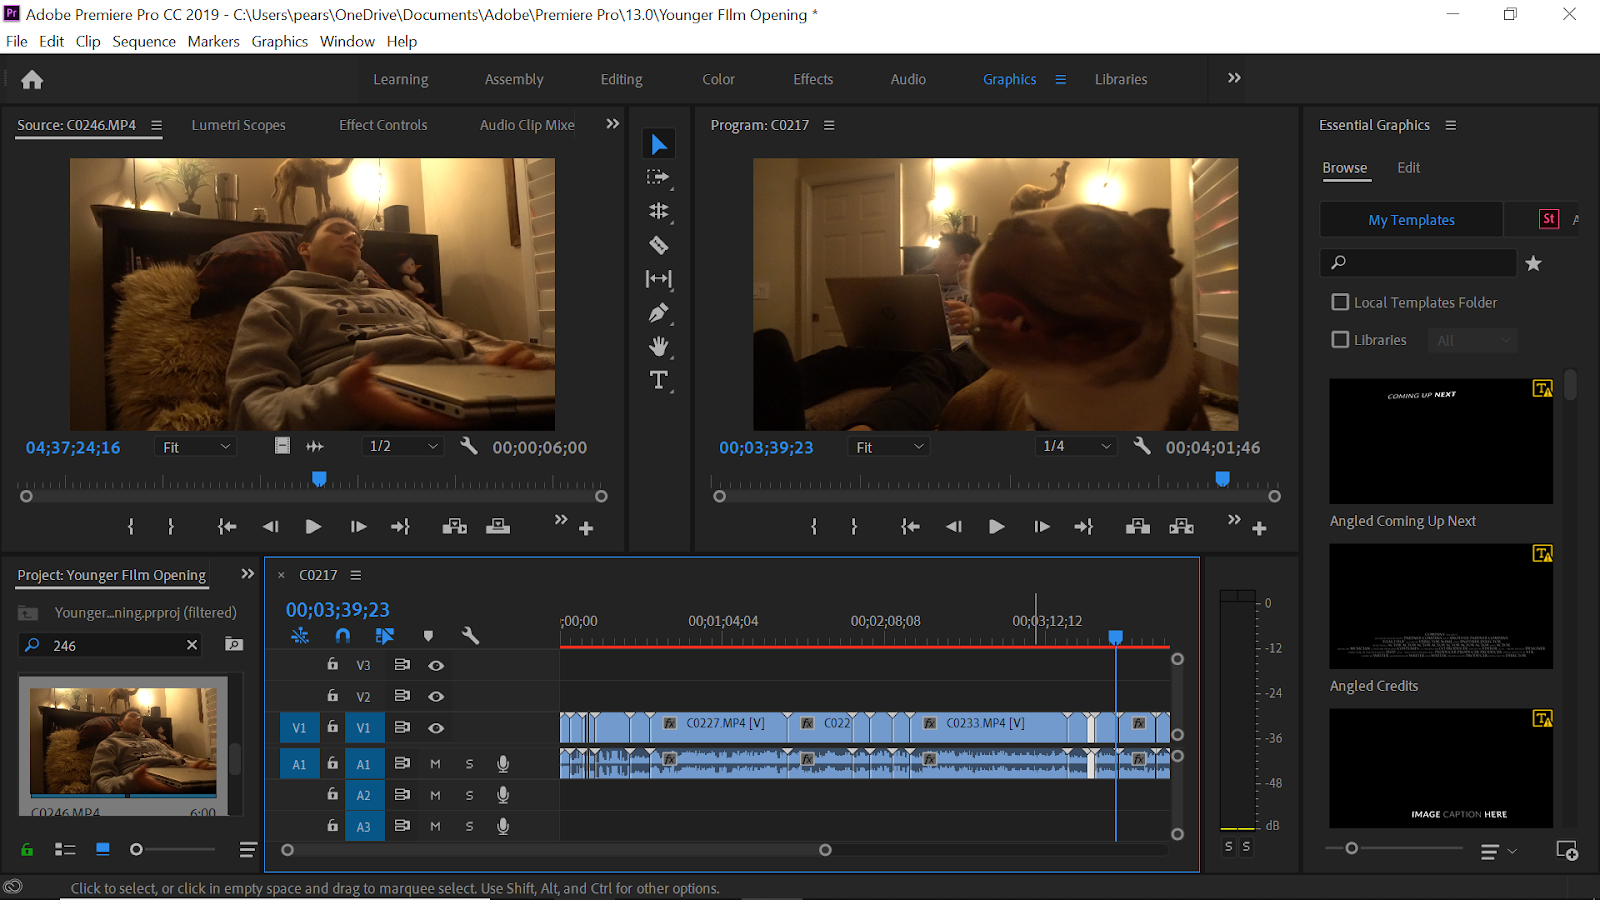 With all my clips on the timeline, so much work is now to be done. Layering of audio, connecting the clips in a cohesive manner, color correction, adding text, and so much more. So I guess this is what I'm going to say, I got some work to do! I'm so excited to see how this turns out and I hope you are too!
Tuesday, March 26, 2019
Making My Footage Cinematic
This is a little last minute research that I have done just to get an idea of ways to make my footage more cinematic and editing techniques specific to short films. Like I have said in my previous posting about editing software, my editing experience has never really expanded into short films, so this is just as much a learning experience for me as it is for everyone else. But overall, I just want to be able to salvage any "iffy" shots and give my piece a professional feel.
Like always, I found comfort going to YouTube for help :)
______________________________________________________________________
Like always, I found comfort going to YouTube for help :)
______________________________________________________________________
Here is an incredibly helpful video I found that lays down important instruction on proper color correction to turn bland footage into something visually appealing. I feel like this is a solid overview of the things I need to do on Premiere just to increase the quality of my piece overall.
___________________________________________________________________
I really needed to find a tutorial specific on editing night time footage. Playing it safe, I never really shoot at night, just because of the difficulties revolving lighting and such. Thankfully, the video below does a great job in detailing how to deal with night time footage. Judging by how my footage looked after filming, this tutorial will be my best friend.
_______________________________________________________________
This last video I found is just for aesthetic purposes. I find most films are presented in a widescreen 21:9 ratio, so sort of the finishing touch of making any footage cinematic is to simply slap on that aspect ratio. So I quickly sifted through YouTube and found this video that helps me do just that!
Sunday, March 24, 2019
Filming
Today was officially the day we filmed for our film opening, "Younger."
Knowing today was really the only time we will be able to film, the stakes couldn't be much higher. We started filming around 10:30 p.m and because of our planning, we finished filming in less than an hour! I know filming at 10:30 p.m sounds a little late, but I can explain. This whole weekend has been full of stress. I actually just finished a weekend long Model United Nations conference in FIU. These debate oriented competitions are extremely stressful and competitive (this girl was full on sobbing when she didn't win anything), and I was lucky enough to claim a 4th place award with my partner Annabelle!
Getting back to the whole filming thing, Raul came over to my house at around 8:00 where we filmed some opening shots with my mom and then we had to wait until around 10:00 for Ellie and Liz to come home. Sadly, Ellie wasn't feeling well so we had her friend Ashlynn fill in for her. Also, I am extremely worried with how this is going to turn out, I'm nervous about how fast we finished filming and I haven't looked at any of the footage yet!!! But I have worked with bad footage in the past (our music video) and in the end, everything worked out fine.
Anyways.. here are some behind the scenes pictures from our filming!!!


Friday, March 22, 2019
The Set for Younger
This post right here is an inside look at the set for the hit upcoming movie, "Younger." But one difference is all of these photos were taken in the daytime. I know you are probably wondering, "Shouldn't you show us what it will look like when you film?" I SAY NO. Well.. just because I am planning a later post specifically about lighting and I want to keep you all on your toes. So this post is just to go in depth about the set choices and the reasons for them.

Right here is where the shots of outside the dinner table where the friend is motioning for the boy to sneak out are. The large, wide window provides an open look into the kitchen and dinner table, perfect for the scene we are trying to create.

Here is the street the will be home of the final shots of our film opening. It is a long stretching rode which will give off that idea of "running away" as the kids ride their bikes off into the distance. At night, the street lights will look great on camera!

This is the place that the dinner scenes will take place. As you can see, the table is placed perfectly in front of the window, which will look cool pairing it with shots from outside. The table is not perfectly neat, showing that it is not some perfect family. The actors will be seated around the table during the scenes.

So this is where all of the kitchen scenes are going to be. It is a simple contemporary/modern style which compliments the "suburban feel." I think that the black counter tops will look great in contrast with the color food on camera.

Here is a shot of the room of the teenage boy. I added lights around the window frame which will aid in lighting as well as give off that indie feel. The bed comforter is rustic which again, furthers the whole feel of the piece.

This is the place where the shots of the boy sneaking out their window and talking to his friend will take place. With the bush right next to the window, it provides ample opportunity to play with focus and foreground blur.
Wednesday, March 20, 2019
Preparing for Editing
Editing is a huge deal in film making, which is why I have to choose a editing software that I can both be comfortable with and get the most out of.
And my choice is....

Premiere Pro!!!!
Being what I have used for all of my past videos, including some of the ones I have made that are not school related. In fact, I used Premiere to edit a music video I made with my friends about a little adventure we had. Here is the link for that video!
Overall, Premiere really is an incredible piece of software. I love the incorporation of many manual options so you can customize basically any part of the footage, from color grading to adding multiple layers to footage. Even though it is extremely pricey, since I took a dual enrollment class at Broward College, I get the student discount for the adobe suite which changes the original $52.99 price tag and lowers it to $19.99! In my opinion, I think that is extremely worth it considering how much I use the software.
With all that said, I still am quite new to the program, and have never edited a short film with
dialogue in it. Let alone a short film on any editing software. (Yes I was one of those kids making edits with a GoPro on Windows Movie Maker) So this will still be quite the learning experience and of course with that comes research!
These videos give a great explanation about work flow and the steps to take when making a short film on premiere.
And my choice is....
Premiere Pro!!!!
Being what I have used for all of my past videos, including some of the ones I have made that are not school related. In fact, I used Premiere to edit a music video I made with my friends about a little adventure we had. Here is the link for that video!
Overall, Premiere really is an incredible piece of software. I love the incorporation of many manual options so you can customize basically any part of the footage, from color grading to adding multiple layers to footage. Even though it is extremely pricey, since I took a dual enrollment class at Broward College, I get the student discount for the adobe suite which changes the original $52.99 price tag and lowers it to $19.99! In my opinion, I think that is extremely worth it considering how much I use the software.
With all that said, I still am quite new to the program, and have never edited a short film with
dialogue in it. Let alone a short film on any editing software. (Yes I was one of those kids making edits with a GoPro on Windows Movie Maker) So this will still be quite the learning experience and of course with that comes research!
These videos give a great explanation about work flow and the steps to take when making a short film on premiere.
Monday, March 18, 2019
Choosing a Font
To many, choosing a font seems like an easy task. But the font of the beginning credits sets the mood for the whole movie. Imagine if Jurassic Park had bubbly letters in their opening scene. It would just look silly. So that is why I find it of utter importance to find a font the correctly embodies the feeling we are trying to put out with our piece. We know we want the piece to be playful yet impactful.
So first I went to FontBundles and found this font
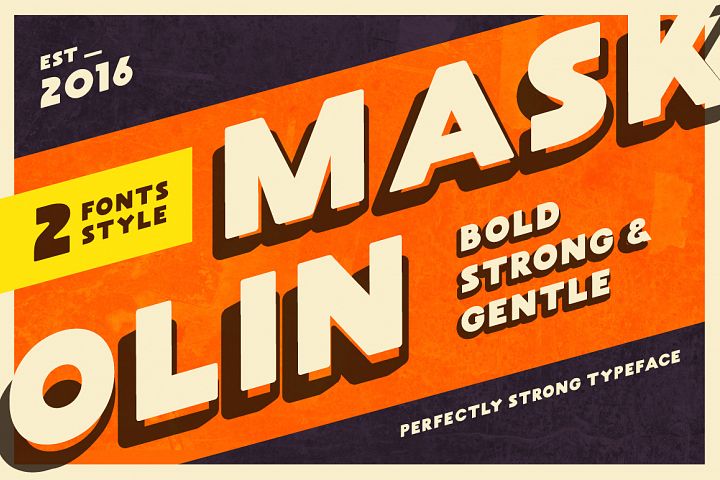
Maskoolin
I really like the 90s feel of the font. Its playful and I feel like it compliments the comedic value we plan on incorporating in our opening.
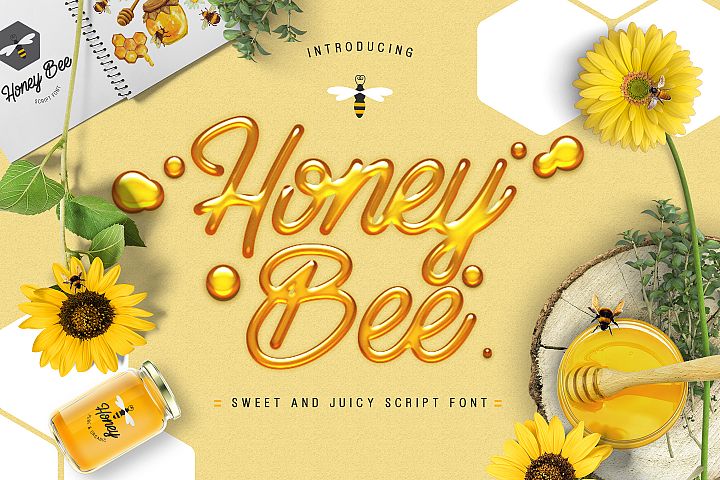
Honey Bee
This font is definitely something different. For some reason I feel like it does a good job describing the feel of the movie. The contrast of the smooth and flowing font and the dark opening will be incredibly interesting.
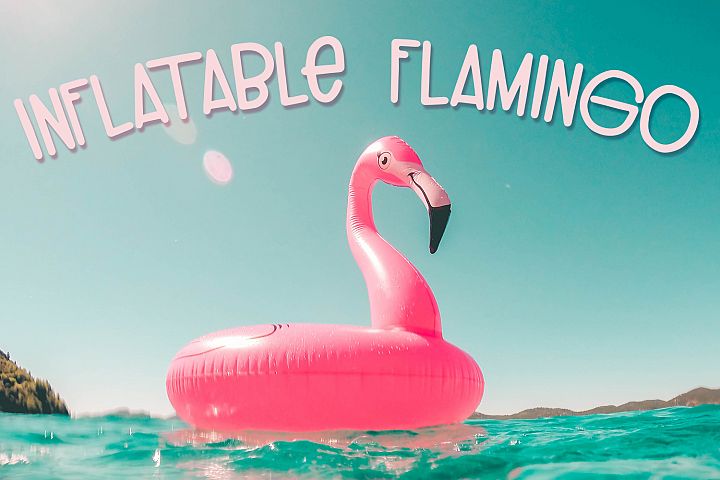
Inflatable Flamingo
Ok I really like this font. It gives of that 90s feel and definitely follow teen movie conventions. It also adds a refreshing change to what normal credit fonts are. I really want our finished product to be something out of the ordinary.
So for right now, I'm pretty sure one of these three fonts is gonna appear in our opening. Of course, stay tuned for more updates.
So first I went to FontBundles and found this font
Maskoolin
I really like the 90s feel of the font. Its playful and I feel like it compliments the comedic value we plan on incorporating in our opening.
Honey Bee
This font is definitely something different. For some reason I feel like it does a good job describing the feel of the movie. The contrast of the smooth and flowing font and the dark opening will be incredibly interesting.
Inflatable Flamingo
Ok I really like this font. It gives of that 90s feel and definitely follow teen movie conventions. It also adds a refreshing change to what normal credit fonts are. I really want our finished product to be something out of the ordinary.
So for right now, I'm pretty sure one of these three fonts is gonna appear in our opening. Of course, stay tuned for more updates.
Sunday, March 17, 2019
Group Meeting #2
Knowing that I was going to have another group meeting this week was really exciting. Having not filmed yet, I've felt like my progress on the opening has been a little slow. So getting updates from other people and their progress has made me feel a lot better. I've actually realized I am going at a pretty good pace considering all the things I have had to worry about this month (finishing the quarter with decent grades, improving on SAT, and training for a Spartan Race). Yep, you heard that right, I signed up for a Spartan Race at the end of April and I couldn't be more excited. But to get to the important stuff, here are some of things I took away from the group meeting:
I was really impressed with how much she has done so far! She is doing a magazine and already has a good layout for her cover and table of contents. She is doing a beauty magazine and is demonstrating a green theme for a march edition. For her story, she mentioned how she wanted to show pictures of beauty products and their descriptions. However, she was having issues formatting her masthead and front cover image.
I am extremely excited to see his finished product. His plot is extremely creative and he is going to film at a skate park in Miami. However, he seemed to be a little behind on the blog. I encouraged him to post more and perhaps have longer and more in depth posts.
Ashley was the second person in my group meeting is doing a magazine. She plans on doing a food magazine and I am both excited and nervous to see how it comes out. Food magazines definitely seem a lot easier than they are to make. She is still developing color schemes and is in the process of planning her cover and table of contents. With trouble finding the best software to edit, Sophie and her had a great conversation about the program, Canva.
Valeria has an interesting yet difficult plot for her opening. She plans to illustrate a family moving to Miami and mentioned how she wanted the opening to have more a montage feel. With plans to use a drone, she was a little worrisome about her lack of experience. She mentioned her struggles achieving permission for a song (Which I spoke more about in this post.) Also, I love her blog!
Thursday, March 14, 2019
Shot List
Instead of making a storyboard, I decided to make a shot list. You can call me lazy all you want BUT let me tell you why.
1. I literally can't draw, so the chances of me being actually able to comprehend the shots I sketch will be a miracle in itself.
2. This week has sucked. After taking two SATs last week, I was only met with an even heavier load of work. So, give me a lil break ;)
3. My shot list is awesome! Since I made it, it was me envisioning the shots in my head. Thanks to my detailed descriptions of the shots, I can easily come up with a visual representation in my head.
4. I feel like with a shot list it is much easier to make changes compared to a storyboard. Rather than erasing a picture and start from scratch, I can make small edits and changes easily on my google doc.
So now that you have read my reasoning for doing a shot list, I'm sure you are bored by now and want to see it!
Wednesday, March 13, 2019
Sound is on its way!
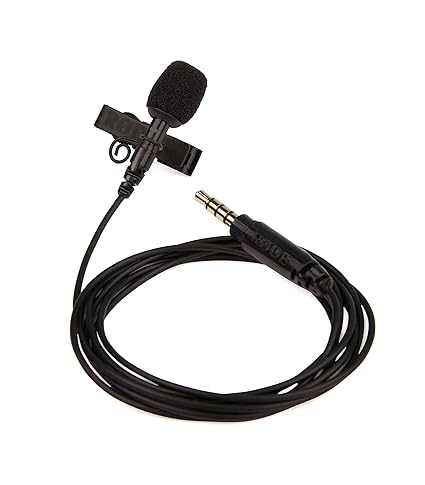
Today is the day I have ordered the equipment I will be using for the film opening. Being a broke teen, I went to Amazon to find an affordable Shotgun microphone (which I have spoken in depth about in this post).
Movo VXR4000R Directional Shotgun Condenser Video
 Here it is, this compact microphone is $30, which really is quite a good deal considering what is currently on the market. It has great quality audio and is very easy to use which I feel is important to me knowing I've never worked with a microphone before. Additionally, I can just plug in right into my camera so no post syncing during editing is necessary (YAYYAY!).
I have decided to not purchase a lavalier microphone for three reasons:
1) They are around the same price as the boom mic and do not have the range of features that a boom mic offers.
2) I am probably not going to use it that much. Much conversations during are film are done in a closer range to the camera.
3) I can just use my phone to capture long distance audio. Its a little downgrade quality wise, but I do not think its worth annoying my mom to purchase another piece of camera equipment.
Below are some videos that I used to ultimately help me pick out the Movo VXR4000R. Enjoy :)
(Here is a solid review video that I found on YouTube)
(A good sound sample from the microphone from YouTube)
Movo VXR4000R Directional Shotgun Condenser Video
Here it is, this compact microphone is $30, which really is quite a good deal considering what is currently on the market. It has great quality audio and is very easy to use which I feel is important to me knowing I've never worked with a microphone before. Additionally, I can just plug in right into my camera so no post syncing during editing is necessary (YAYYAY!). I have decided to not purchase a lavalier microphone for three reasons:
1) They are around the same price as the boom mic and do not have the range of features that a boom mic offers.
2) I am probably not going to use it that much. Much conversations during are film are done in a closer range to the camera.
3) I can just use my phone to capture long distance audio. Its a little downgrade quality wise, but I do not think its worth annoying my mom to purchase another piece of camera equipment.
Below are some videos that I used to ultimately help me pick out the Movo VXR4000R. Enjoy :)
(Here is a solid review video that I found on YouTube)
(A good sound sample from the microphone from YouTube)
Tuesday, March 12, 2019
Casting
THE OFFICIAL CAST OF 2019'S NEW HIT FILM, "YOUNGER" HAS BEEN CHOSEN! YAY!
Pearse Koch (Camera dude)
 So I found this picture of me in 6th grade and I thought I looked kinda cute. ;) LOL jk but anyways I will be doing most of the filming, so I will sadly not appear in the opening.

It was a tough race between choosing her and Christina Aguilera, but in the end, we had to go with my favorite mother of all time, Amy. Being not only the coolest and silliest mom in the world, there is no reason she can't take on this role. She will have a couple of major lines, of which I'm sure she will nail.
Raul Passarini (John/Main Character)

Working double-time as both filmmaker and actor, I have no worries for what this youngin can accomplish. Being the main character, he will have the most lines and the most pressure. I'll be sure to take a lot of high-angle shots of him. He loves them! :)

Ellie Koch (Sammy/John's Sister)

As my twin sister, there is no other person I can trust to play John's sister! She was quick to beat out Lady Gaga and Emma Stone at auditions. Her role is more of an extra, with minimal lines that don't really develop the opening. (Oh btw this picture is her when she was in 5th grade)
Thats it! The good thing about having a small cast is less things to keep track of. I am so excited to start filming next week! Like always, I'll keep you posted.
***DISCLAIMER: THEY ALL LET ME USE THESE IMAGES OF THEM***
Pearse Koch (Camera dude)
 So I found this picture of me in 6th grade and I thought I looked kinda cute. ;) LOL jk but anyways I will be doing most of the filming, so I will sadly not appear in the opening.
Amy Koch (The Mom)
It was a tough race between choosing her and Christina Aguilera, but in the end, we had to go with my favorite mother of all time, Amy. Being not only the coolest and silliest mom in the world, there is no reason she can't take on this role. She will have a couple of major lines, of which I'm sure she will nail.
Raul Passarini (John/Main Character)

Working double-time as both filmmaker and actor, I have no worries for what this youngin can accomplish. Being the main character, he will have the most lines and the most pressure. I'll be sure to take a lot of high-angle shots of him. He loves them! :)

Elizabeth Riley (Liz/The Friend)
Being a close friend of mine, I have carefully chosen her to play the friend that encourages the main character to sneak out of his house. She will have to show off her "naughty side" and her full range of acting abilities.
Being a close friend of mine, I have carefully chosen her to play the friend that encourages the main character to sneak out of his house. She will have to show off her "naughty side" and her full range of acting abilities.
Ellie Koch (Sammy/John's Sister)

As my twin sister, there is no other person I can trust to play John's sister! She was quick to beat out Lady Gaga and Emma Stone at auditions. Her role is more of an extra, with minimal lines that don't really develop the opening. (Oh btw this picture is her when she was in 5th grade)
Thats it! The good thing about having a small cast is less things to keep track of. I am so excited to start filming next week! Like always, I'll keep you posted.
***DISCLAIMER: THEY ALL LET ME USE THESE IMAGES OF THEM***
Sunday, March 10, 2019
The Plot
We have officially done it. Raul and I have decided upon a plot. Here it is:
The film opens with an establishing shot of a house in the suburbs. The next shot will feature a family having dinner. We want to illustrate the tension in the family by showing an awkward dinner with only the sounds of forks scraping and chewing. Possibly with an over-the-shoulder shot, another teenager is seen through a window behind the family eating. The teen motions to the main character eating dinner (another teenager) to sneak out. The main character abruptly starts to eat incredibly fast, sparking concern from his family. With some fast paced editing we vision the kid quickly clearing their plate and putting it in the dishwasher, to then run off to their room. Running into his room, he quickly makes his way to his window and opens it to meet their friend outside telling him, "Let's sneak out." With some initial hesitation, the main character quickly rampages through his room, grabbing his essentials, and setting up a dummy to ensure he will not get caught by his parents. During this sequence, we plan to incorporate parallel editing to illustrate the lack of care from the parents as their child is making tons of noise in the other room. Back in the kid's room, he eventually escapes by jumping out of his window, and running off with their friend. Multiple shots will be incorporated to illustrate the main character jumping through the window and grabbing his bike from the side of his house. We plan to end this scene with a long shot of the kids biking away with the house in the background. When the teens leave the frame, the title of the movie is displayed, "Younger."
Of course, not everything can be planned to the T, but this plot is what we are striving for. Changes will be made to combat issues with budget and overall resources. With the creation of a storyboard, hopefully this plot will be a lot easier to envision. Due to the amount of diegetic audio being used in this plot and the night time setting, the major issues that we might have is sound and lighting. Thus, lighting and audio is what I will be practicing and researching leading up to the film date.
Saturday, March 9, 2019
Finding a Song
I know many of you reading this love the music that can be found on one of those copyright free websites. But in my opinion, I really can't stand those cheesy overused songs. So that is why Raul and I decided to find music the hard way. By asking for permission.
First, I had to actually learn how to ask permission to use a copyrighted song. I came across this website.
These are steps we had to take:
2. Send them a letter (We used this template to do so)
But we fell into a dead end. After going on countless websites that advertised their "free music search software" only to be sent to a $50 sign up page, I realized asking for permission was a little far fetched. The whole process is really confusing. Apparently, in order to get full permission to use a song you have to get in contact with both the writer of the song and the recorder of it. Let alone finding the correct email to contact is a maze in itself. Funny how you can find out someone's home address before finding their email. In addition, the chances that we will be asked to pay a fee once contacted back is quite high.

Here is snapshot of one of the many websites that allows you to "search for music publishers." After spending 10 minutes navigating through the website and finding the song I was searching for, I was met with this beautiful subscription message!

Here is snapshot of one of the many websites that allows you to "search for music publishers." After spending 10 minutes navigating through the website and finding the song I was searching for, I was met with this beautiful subscription message!
Sadly, we are going to have to head to the "lame" copyrighted music scene. I'm confident I can make it work though. Hopefully there are a couple of un-copyrighted music resources out there with music that won't make my ears bleed. So if you were looking for a hit Ariana Grande song in our opening, you might have to look the other way.
Friday, March 8, 2019
Setting and Props!
Although Raul and I have not yet completely agreed on all details of a specific plot line, we have reached common ground on the general setting and feel of the piece. In terms of setting, we plan to film at my house, which is a medium-size one story home in a gated neighborhood. Being a common suburban house, we plan to use that to develop the idea of an "everyday teen." We are going to do most of our shooting at night so we are going to need to make use of artificial light to light my home in a natural way that looks good on camera. I'm pretty set on giving our film more of an indie feel, so our creation of setting will be done with inspiration to the 80s/90s. Knowing this, I am going to have to get some props. I've taken it to google to achieve some inspiration.
Bedroom
My idea for the teens room is very floral, lots of greenery and lights placed across the ceiling. Knowing a room can say a lot about a person, I want to portray the main character to be artistic and creative. Adding in a more rustic, whimsical feel with a record player and wood furniture will compliment that feeling.

In this bedroom, I really like the use of plants above the bed and the brown chair acting as a focal point. I enjoy the iron bed frame, but I'm most likely going to stick with the one I have in my room. I'm certain I don't want my bank account going any lower than it is now. Lastly, I really like how many lights are incorporated throughout the room.
Dining Room
Since the setting is the average suburban home, I want to give off that feeling in the dining room as well. In terms of props, I will just use items that I have at my own house. I want to really give off that "lived in" vibe so it would look unrealistic to see a family eating dinner together on a weekday with a beautiful plate of food and crystal clear counters. I want to make the setting as realistic and raw as possible.

This is a picture not from the internet but from my own house. This is where we plan to film our scenes with the family sitting down at dinner. As you can tell, it isn't the prettiest interior design, quite normal actually. But normalcy is the feeling that I want to give off, so changes to this part of my house will be only minimal.
Details
No phones. Although we will not be directly stating the time period of this piece, we want to imply 80s/80s origins. Similarly to the show Umbrella Academy, which is based in the present time but social media and cell phones are absent, we want to eliminate smartphones in our film. Not only will the filming process be more difficult with phones as props, phones do not develop or advance our plot in any way.
Sources
Bedroom
My idea for the teens room is very floral, lots of greenery and lights placed across the ceiling. Knowing a room can say a lot about a person, I want to portray the main character to be artistic and creative. Adding in a more rustic, whimsical feel with a record player and wood furniture will compliment that feeling.
In this bedroom, I really like the use of plants above the bed and the brown chair acting as a focal point. I enjoy the iron bed frame, but I'm most likely going to stick with the one I have in my room. I'm certain I don't want my bank account going any lower than it is now. Lastly, I really like how many lights are incorporated throughout the room.
Dining Room
Since the setting is the average suburban home, I want to give off that feeling in the dining room as well. In terms of props, I will just use items that I have at my own house. I want to really give off that "lived in" vibe so it would look unrealistic to see a family eating dinner together on a weekday with a beautiful plate of food and crystal clear counters. I want to make the setting as realistic and raw as possible.

This is a picture not from the internet but from my own house. This is where we plan to film our scenes with the family sitting down at dinner. As you can tell, it isn't the prettiest interior design, quite normal actually. But normalcy is the feeling that I want to give off, so changes to this part of my house will be only minimal.
Details
No phones. Although we will not be directly stating the time period of this piece, we want to imply 80s/80s origins. Similarly to the show Umbrella Academy, which is based in the present time but social media and cell phones are absent, we want to eliminate smartphones in our film. Not only will the filming process be more difficult with phones as props, phones do not develop or advance our plot in any way.
Sources
“I Don't Think I'd Want That Many Plants above My Head at Night, but I like This. And I LOVE That Seat! | Bedroom | Pinterest | Bedroom, Bedroom Plants and Bedroom Decor.” Pinterest, Pinterest, www.pinterest.com/pin/114912227976552690/.
Tuesday, March 5, 2019
Timing is Key
So far this week has been good. I had my job interview yesterday which I'm pretty confident about and I'm pretty sure I didn't completely fail my math and biology quizzes! Also, I'm taking my first of two SATs this week tomorrow. Hopefully my brain doesn't turn to mush. Anyways... Looking forward to the day this project is due, we only have about a month until our projected finish date. Although that might seem like a lot of time, it really isn't which is why proper planning is key. Without proper time management, I'm just asking for stress. So I am going to combat that with this post. :)
Here is our pretty rigid schedule that I really hope we stick to:
Here is our pretty rigid schedule that I really hope we stick to:
- 3/10: Plot Finalized
- 3/11: Contact record labels for music permission
- 3/14: Purchase audio equipment/ any props
- 3/15: Storyboard Done
- 3/16: Practice with lighting, assemble the set, prepare actors (create a script)
- 3/28: Filming Done
- 4/3: Editing Done
- 4/7: CCR Done
Even though Mrs. Stoklosa gave us an excellent schedule for this project, I wanted to create a more personalized version of it. Of course the schedule above is subject to change, for who really knows what might come up inhibiting our production. I actually want to move a lot faster through the schedule, so I have more to time to find and learn ways to make the most out of this opening.
Also!!!!!! I will periodically going back to this blog post and updating this schedule. By highlighting the actions I have done in yellow or adding more things to do, you guys can follow Raul and I through our journey of accomplishing all of our tasks on time! Well... Hopefully.
Sunday, March 3, 2019
Audio...
Now for this blog posting I am going to be talking about audio. In my past postings I have been briefly over viewing my plot ideas as well as gathering inspiration, but now that I have a decent idea on what I want my film opening to be about, I need to start thinking about important things like sound and audio. Rather than slapping some music over clips, Raul and I have decided to take a riskier route with our opening and incorporate mostly dialog and ambient sound. Knowing this, I had to do some research. My sound equipment set up is quite minuscule, I have my built in Sony a6300 microphone. That's it. From past experiences, this microphone does nothing close to the quality I'm looking for. Being the cheap teenager I am, I went straight to Youtube and looked up "Cheap audio equipment" and found these videos:
Now with these videos I came across three different types of microphones that might be useful for our production:
1. Shotgun Mic

Now this piece of audio equipment is something that I am almost certain I'm going to have to purchase. It is quite versatile, meaning I can rig it to a boom poll, allowing Raul and I to hold it as close as possible to our subject (out of the camera frame of course) in more mid range situations. Also, I can attach the mic directly to my camera which is perfect for shots with ambient noise or close up shots with dialogue. Of course these mics can be quite pricey, so I will be surely surfing Amazon for the cheapest option.
2. Lavalier Microphone
This microphone is something I'm a little more on the ropes about just because of my third option. The lightweight and compact size of this mic allows us to attach it to our subject and get quality audio from the widest of shots. Knowing we are going to be shooting mostly indoors, I'm not sure if we will be needing this. Additionally, a large issue with this is post editing where we would have to sync the audio with the video, a tricky process. However, a lavalier is useful for picking up movement such as putting a plate down, walking, turning a sink on, etc.
3. Iphone
Lastly, and definitely the most cost effective, is just our phone. Probably most useful in tandem with a boom mic, the simple voice memo function can be useful similarly to how a lavalier mic is, picking up audio from wider shots. We would just simply place the phone close to our subject and be able to capture crisp audio. Of course quality will be sacrificed with this method, but spending $30 on a mic I might not even need does not seem well worth the cost.
Friday, March 1, 2019
Group Meeting #1
Today marks the day of my first group meeting! When I walked into class today and was told I was not going to be sitting independently working on the blog all period I was a little disappointed. I thought to myself, "We just started the project, why would we need to talk about our ideas now, when we barely have any." Well, Mrs. Stoklosa wins again, the group meeting was a success. I learned a lot of new things and got a good idea of where I need to be with the project. It was interesting hearing from the perspectives of multiple people. So below, I will be mentioning the people I was privileged with working with and giving an overview of their progress and main details of their projects.
Juan
He was the only one in my group that wanted to do their opening based on the comedy genre. Although, he did not have much idea on what his plot is going to be, its understandable being only the beginning weeks of the project. His blog is well done but we encouraged him to incorporate more pictures.
Santi
Similarly to my genre, Santi chose teen drama. We agreed upon the idea of making sure that our filming plan is actually possible to achieve. One of his plot ideas includes documenting a family moving to South Florida. He plans to go to Miami to shoot the opening scene. With possible use of a drone, I'm excited to see where his production goes.
Onil
Onil definitely had some interesting ideas. Being another teen drama genre opening, her ideas were really well thought through. I enjoyed how she stressed the importance of having a god team member who works well with you. She spoke a lot during this meeting giving me plenty of ideas that I could work with such as contacting record labels soon to get approval for music.
Valentina
She was the only one in our meeting that is doing a magazine. Her chosen genre is beauty and fashion and she seemed to have a really solid ideas about her future plans. Being on the beginning weeks of the project, she is still thinking of layouts to use with her partners. I enjoyed her perspective being one of the few students in the class not doing a film opening.
Daniela
Daniela is doing a film opening, and she chose the drama genre. She has a creative plot idea involving a depressed teen and even plans to transform her living room into a doctor's office. I'm excited to see where that goes!
Wednesday, February 27, 2019
Brainstorming
So I feel like I've been in a bit of a rut with this whole blog thing. I've been having difficulties figuring out exactly what to write about and how to write it, but now that I have been looking into some of the really well done blogs such as Nick's and Lucie's, I have noticed what I am really missing. Myself. Yes my last posts were about research and that can be quite boring at times, I still feel like I need to spice things up a bit and make things more personal. I feel like I'm a fun person and this project is kinda making me seem wayyyyy too serious. Also, when I'm looking back at this blog as a 30 year-old I don't want to see a bunch of clips with meaningless research text underneath.
With all that said, I'm making this post for brainstorming purposes. Raul and I have been deeply thinking about what we want our story to be. This part of the process is not only the most annoying (because I'm having a hard time figuring out where to start) but it is also the most tedious. Us teens have a lot going on inside our heads so it is kinda hard to pull out a banger idea in the matter of days.
BUT, we do know something, and we DO have ideas. We know that our film opening is going to be relating to the teen drama genre. Raul and I have decided on this but we haven't really thought of specific story lines, at least not together... From my individual brainstorming I've come up with a couple broad ideas:
1. A misfit teenage boy is unhappy with his home life so he often sneaks out to places he is not supposed to be.
Okay here me out, I was thinking maybe we shoot at Everglades Holiday Park for the opening shot consisting of the main character thinking by himself in the wild. Then it cuts to him at home where he is having dinner with his family. I would emphasize his unhappiness being at home, and then possibly have a sequence of him sneaking out after dinner.
2. A teenage boy sneaks out to hang out with friends.
For this idea, I would start with a dinner scene with family and then have the main character constantly looking out the window to see his friends urging him to sneak out. Then after I'll do a sequence of the kid sneaking out and enjoying life with his friends. I know you are probably wondering, "Pearse, what is your obsession with family dinners and sneaking out?!" Let me reassure you I'm just brainstorming silly!
3. Collage??
So the truth is, I don't really have a third idea... at least not yet, but I didn't wanna seem lazy and only have two, so by collage I mean doing a sequence of shots with music behind it as the opening. I see a lot of films being opened in this manner usually introducing setting or characters, so maybe I can do that of a school, or maybe different friends in a friend group. Yeah, I pretty much made up this idea a couple minutes ago and the more I write about it the more it interests me. Looks like this blog helps after all!
Tuesday, February 26, 2019
Example Film Openings
1. Establishes Setting
From this collage of film openings, I found many of them starting with an image of a location, whether is be a long shot of planets, a medium shot of some palm trees, or even a fast panning aerial shot of a city in the opening of the movie Leon. This makes sense in my mind, as setting is one of the most important components in introducing a story. Looking into my future project, possibly starting with a long shot of buildings is the way to go.
2. Establishes a character
Something else I noticed about a bunch of the opening shots from this YouTube video had people in them. Often opening shots serve to introduce the main or supporting character right at the beginning of the movie. For instance the opening shot of the movie, Road to Perdition, shows a zoom of a young man with his back to the camera, acting as short introduction of the character.
3. Other
This last category is what I made for all the things featured in the first shot that are not locations or people. I see openings shots of cars, tree branches, and flags in the video collage. The most memorable one for me was the opening shot from The Matrix, which features the green numbers which are an iconic detail of the film. However, as opening shots mostly introduce people or settings, I find myself straying away from the "other" category in the future.
Sunday, February 24, 2019
Inspiration!!!
Beginning this giant project, we are still unsure of what we actually want to create. With so many options, its hard to create an idea for only the most important project of the year. So for right now, what I am really searching for is some inspiration. Although we have singled it down to the teen drama genre, we still have yet to figure out specific details. Ever since I was a little kid, 80s and 90s movies or movies based in the 80s or 90s always interested me. The whole vibe and aesthetic of movies in that era is something Raul and I want to emulate in our film opening. So with this blog post, I will be providing examples of some great film openings and sort of explaining things I like about them, and how they can be used to influence the outcome of our upcoming piece.
#1 Call Me By Your Name (2017)
For this opening scene, I enjoy the simplicity of it. There is just the right amount of background noise to allow for the audience to really feel like they are apart of the scene. I really like the use of natural light and that is something I want to consider when creating my opening scene. Particularly, I want to emphasize the more natural feel, so a lot of ambient noise will be used in our opening.
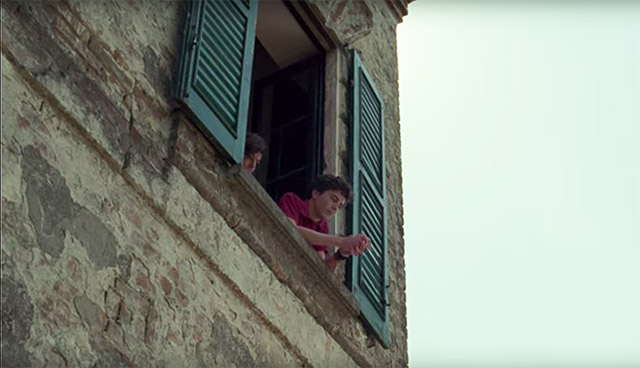
In this screen grab from the the opening scene, this simple low angle shot allows for a good sense of setting to be established, noting the architecture of an old Italian villa. Additionally, it offers introduction to the main character, Elio, played by Timothee Chalamet. This movie is based in the 80s, so the style of the shots are very simple yet create a big impact.
#2 Dazed and Confused (1993)
A little different than the film opening for Call Me By Your Name, this opening follows the more montage style. With the song, "Sweet Emotion" playing throughout its whole duration, it allows for great introduction of the high school and the different students in it. I enjoy the varying of shots in the opening, a mix between close ups, long shots, and medium shots, and most importantly, the pacing. I feel as if the pacing of the shots in this opening is spot on. Seeing how successful montage sequences can be in opening a film, that is definitely an option for us looking forward to our own opening.

For this screen grab of the opening scene, it features one of the montage clips that is played over the song "Sweet Emotion". This high angle shot allows for introduction of particular high school students, for this shot, a group of teenage girls. I enjoy how simple this shot is, yet how much detail it holds in relation to the grungy vibe of the movie.
Subscribe to:
Posts (Atom)
-
Here is my Creative Critical Reflection!! https://drive.google.com/file/d/1Ct0SX8KJsH3UnB40P918_kil9c3ZNjit/view?usp=sharing
-
Now for this blog posting I am going to be talking about audio. In my past postings I have been briefly over viewing my plot ideas as well ...
-
I would have never guessed this project would turn out the way it did. When we first got assigned the Portfolio Project in class and st...
