Here it is:
https://drive.google.com/file/d/1zidK6o4N-ibEl3eHVQpWMg8kY-lZk8Ru/view?usp=sharing
Sunday, April 7, 2019
Creative Critical Reflection (CCR)
Here is my Creative Critical Reflection to my film opening, Younger.
https://drive.google.com/file/d/1QRkuI4hcku9cEzOW_o4a2s-yknoaUI6f/view?usp=sharing
Bibliography:
https://docs.google.com/document/d/1k4T7e_MdRuE7Ba0SauwCI3kQGwNL5LqBdxmWZSmlOik/edit?usp=sharing
https://drive.google.com/file/d/1QRkuI4hcku9cEzOW_o4a2s-yknoaUI6f/view?usp=sharing
Bibliography:
https://docs.google.com/document/d/1k4T7e_MdRuE7Ba0SauwCI3kQGwNL5LqBdxmWZSmlOik/edit?usp=sharing
Saturday, April 6, 2019
Quick Reflections
Overall this project was such a great test of my imagination, time management, and team building skills. I'm glad to have taken this class where I get a chance to test my true creative abilities (even when it makes me sacrifice a weekend editing). Thanks Raul for sticking with my through this whole journey. Now I got to get back to work!
Friday, April 5, 2019
Lighting
Like I said in my post about "The Set for Younger," here is a post about the lighting I used during the filming process. I will be showing screen grabs from the final piece to depict the different lighting styles I used and also to give you a little sneak peak!
 For this scene, we mainly used the lighting inside my room which included multiple hanging lights which I think really fills the shot with light yet still giving a moody vibe.
 For this hallway shot, no lighting techniques were really used. Simply the lights on the ceiling did the trick. :)
 This shot is probably where I think we went wrong during the filming process. I was hoping the light from inside would brighten her face more, and sadly the lights on her left don't do much justice in giving her a back light. Mistakes happen!
 For this long shot we again used the LED light box to give off more light in the front, and the positioning of the street light in the back offered light behind the subjects. However, I do find the blaring light a little distracting.
 For this shot I had my friend holding an LED box light high above our heads to give off that "moon light" feel. The lights from inside my room gave him good back light.
 For the shots in the kitchen, we just turned on all the lights in kitchen as well as all surrounding areas to give a balanced lighting scheme. We wanted to make the kitchen scene look as authentic as possible.


Thursday, April 4, 2019
The Final Stretch
YAY!!!! The final stretch. This week is the last week for creating my film opening which has involved countless hours of editing both my CCR and film opening.
__________________________________________________________________
Here are some things I did during this final week:
I found audio!
I found this copyright free song and the notice is screenshotted Above!! I found this song about five minutes into my search and I just knew that it was the one.


I found audio!
I found this copyright free song and the notice is screenshotted Above!! I found this song about five minutes into my search and I just knew that it was the one.


__________________________________________________________________
I figured out color correcting!!


Here are two screen grabs from footage of the film opening. The one above is the final color corrected footage. From my research I have noticed the success of a orange and teal color scheme. So I took inspiration from that and adapted my own style to the orange and teal style giving the shots an additionally more warm and moody feeling.
__________________________________________________________________
I Finished editing the film!
I would give you some details about the film but...... you will have to find out on Sunday!
___________________________________________________________________
I began editing my CCR!
Oh boy was this a project, with all these videos of me talking, I guess you can say that I am already sick of myself. I'd say editing the CCR will take twice as long due to me having to condense 25 minutes of me talking to 7 minutes. Also, the amount of times I had to cut out me saying "um" makes me want to punt my computer across my room. But anyways, I will get it done. :)))

Sunday, March 31, 2019
The Editing Process
Spring break was incredible. I did great at my MUN conference and went on an amazing road trip to Charleston, South Carolina. However, I definitely slacked a little on moving forward with my project, but I can say editing is in progress. This post goes through how I began editing the film opening.
 Starting any edit is a daunting process. Seeing that blank editing screen really puts the amount of work I need to do into reality. This image shows my favorite format to edit videos on Premiere. I keep it mostly default, but I make sure the timeline is zoomed in a lot because I like to be able to see and work with as much of the clips as I can. For this edit in particular, I will leave the graphics tab open so that I can easily add titles and credits.
 This photo pretty much describes my experience editing with Premiere. It is a powerful editing software, so it often causes my computer's tiny processor to crash a lot... and I mean A LOT. So much so I literally have to save my work every five minutes. I would hate for an hour of work to disappear (which has happened an overwhelming amount of times)
 Now is the time to start putting the clips on the timeline. At this time I go through each clip in chronological order and double click so I can do some quick trimming (in the top right corner)
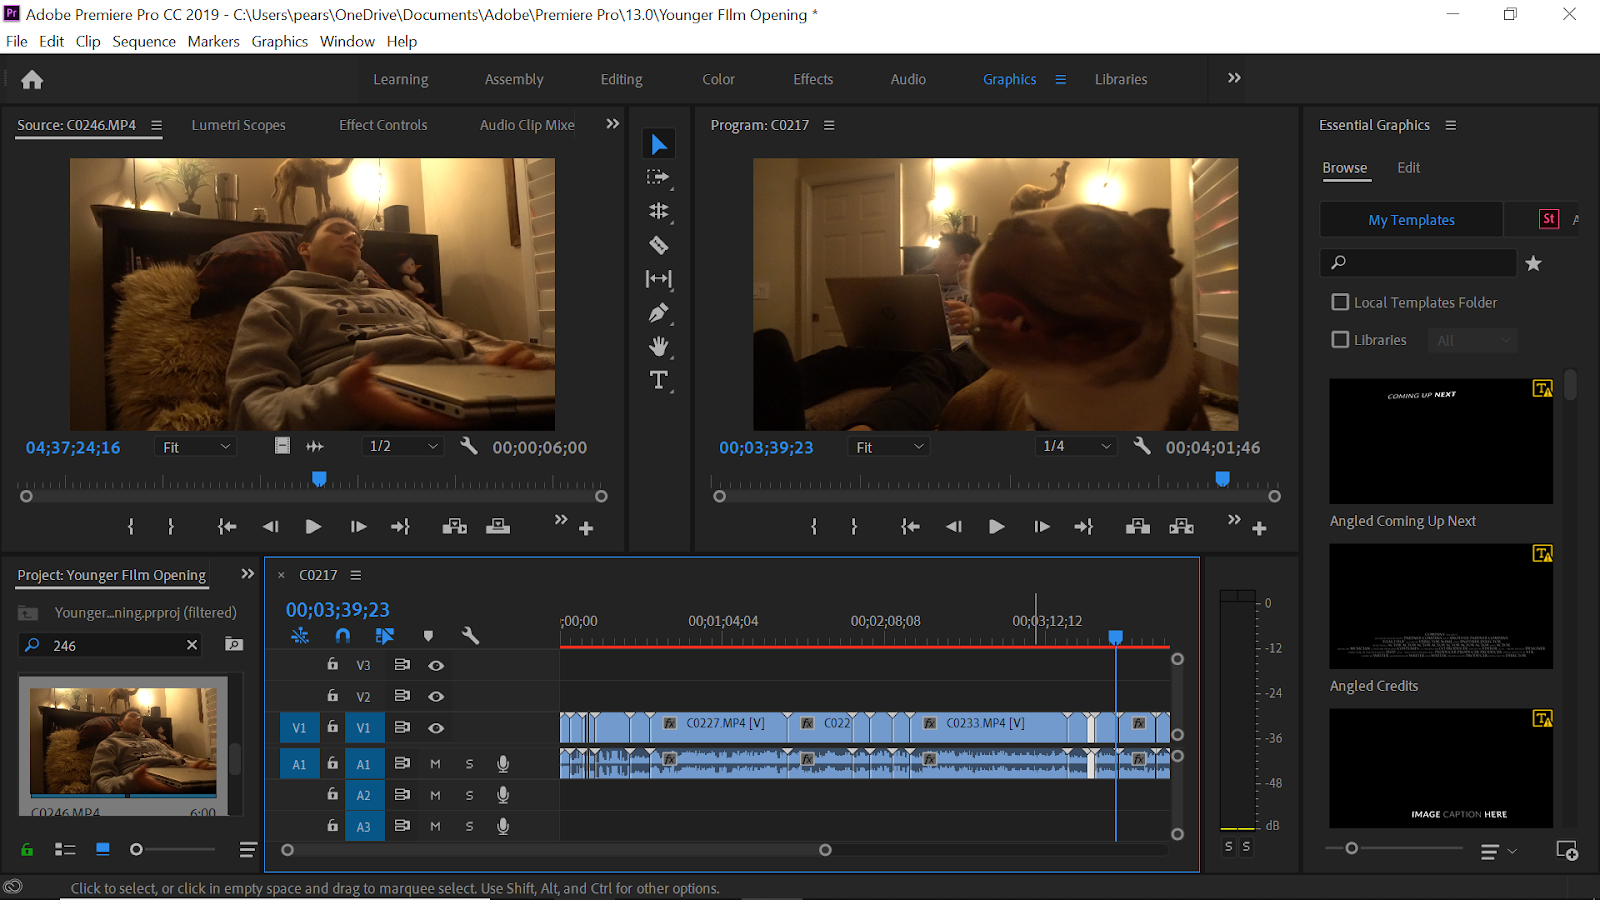 With all my clips on the timeline, so much work is now to be done. Layering of audio, connecting the clips in a cohesive manner, color correction, adding text, and so much more. So I guess this is what I'm going to say, I got some work to do! I'm so excited to see how this turns out and I hope you are too!
Tuesday, March 26, 2019
Making My Footage Cinematic
This is a little last minute research that I have done just to get an idea of ways to make my footage more cinematic and editing techniques specific to short films. Like I have said in my previous posting about editing software, my editing experience has never really expanded into short films, so this is just as much a learning experience for me as it is for everyone else. But overall, I just want to be able to salvage any "iffy" shots and give my piece a professional feel.
Like always, I found comfort going to YouTube for help :)
______________________________________________________________________
Like always, I found comfort going to YouTube for help :)
______________________________________________________________________
Here is an incredibly helpful video I found that lays down important instruction on proper color correction to turn bland footage into something visually appealing. I feel like this is a solid overview of the things I need to do on Premiere just to increase the quality of my piece overall.
___________________________________________________________________
I really needed to find a tutorial specific on editing night time footage. Playing it safe, I never really shoot at night, just because of the difficulties revolving lighting and such. Thankfully, the video below does a great job in detailing how to deal with night time footage. Judging by how my footage looked after filming, this tutorial will be my best friend.
_______________________________________________________________
This last video I found is just for aesthetic purposes. I find most films are presented in a widescreen 21:9 ratio, so sort of the finishing touch of making any footage cinematic is to simply slap on that aspect ratio. So I quickly sifted through YouTube and found this video that helps me do just that!
Subscribe to:
Posts (Atom)
-
Here is my Creative Critical Reflection!! https://drive.google.com/file/d/1Ct0SX8KJsH3UnB40P918_kil9c3ZNjit/view?usp=sharing
-
Now for this blog posting I am going to be talking about audio. In my past postings I have been briefly over viewing my plot ideas as well ...
-
I would have never guessed this project would turn out the way it did. When we first got assigned the Portfolio Project in class and st...
